home tutorials recipes aprons/patterns Soaps

Monday, December 31, 2007

Just For Me! Hee Hee

As I was out shopping for last minute supplies last week, I found this wonderful combination of fabrics.
My Apron 1
I screamed BUY ME LUCY!!
So I did what all self respecting fabric addicts do, and bought it.
No it wasn't on my list, nor was it in the budget but it had to be mine.
I did do good things with it though. I had my sister Eileen of Oregon for Christmas this year so I made her a most marvelous apron from it.
My Apron 2
I had to make one for myself at the same time. I would take pictures of it on but it drowned my daughters and I can't take pictures of myself very well. Besides, I have bed hair and am still in my Jammies and you don't need to see that. hee hee
So.... here are the other shots of it.
My Apron 3
My Apron 4
up close
My Apron 6
Those fabrics just make me happy. I am in apron love.

Sunday, December 30, 2007

December Apron - Repurposed Skirt

OK here is the quickest Apron Tutorial yet. I wanted something that would be fast and easy and require little sewing skill.

Materials:
-One thrift store skirt
-scrap fabric for ties (unless you use the skirt)

Directions:
1. Go to the thrift store (or your closet) and find a skirt that you like but don't want to wear as a skirt. Choose something out of cotton if possible. A denim skirt makes a good heavy apron and is a great way to re-purpose and out of fashion skirt.

DA1
I found this apron in a box of fabric at my mom's house. It must have been a costume that belonged to one of my older sisters. My girls thought it looked very Cinderella-ish and want it for an apron.

2. Cut the skirt up the back, removing the zipper or buttons or what ever is there to close the skirt.
DA2
Use a rotary cutter and ruler to even up the edges if necessary.
DA3
3. Make the ties.
Option 1 - Cut two strips from a coordinating fabric. I cut mine 4" by the width of the fabric (about 42").
DA7
Option 2 - If the skirt has ample fabric, you can cut two strips from the back when you cut the skirt open. You can cut them about 2-4 inches wide by the length of the skirt.
DA8
Which ever you choose, you will then need to hem the edges and ends as you desire. I folded mine under and top stitched them.
4. Now finish off the edge of the apron. I just folded the edges under and stitched them down.
DA4
Then I attached the ties at the top of the waist band.
DA5
Now you are done. You can add a pocket if you like. If the skirt already has side seam pockets you already have some.
DA6

Thursday, December 27, 2007

Prairie Hen Promise

Whew! Christmas is over, again. I love Christmas but usually feel like I am crashing the day after. After weeks of living on adrenaline and no sleep and being hopped up on all kinds of Christmas candy, I am ready for some sleep and nothingness.
It usually motivates me with thoughts of "this won't happen next year!" and the like.
I do look forward to the new year. It is fresh with no mistakes in it. I love the chance we get of making our lives over once more and the hope to get it together better this year.
On that note I wanted to tell you about the Prairie Hen Promise. The Hens and I got together here at my house yesterday. We talked about what worked this year and what didn't. We found that when we are called upon to do something we usually are able to pull it off, even at the last minute because we are pretty smart and talented. However, when we promise ourselves that we will do something, we rarely do it. There is no accountability and we find ourselves shoved to the back burner for other's more pressing needs.
This year we are making the Prairie Hen Promise to stick to our goals. Since each of us in the group are house keepingly Challenged, we have set some specific goals to help us conquer the chaos and give ourselves a peaceful Christmas next year. This year I am going to work on a Christmas project each month so that I am finished by Dec 1st and can enjoy my family the way Christmas was intended.
I have broken my promises up into some categories. Each month I will set new promises on my Hen Day and will return and report my progress.
Here goes for my January 2008 Prairie Hen Promises

1. The Home - I promise to shine my sink every night before I go to bed.

2. Organization - I will start at my front door and organize one closet, cupboard, drawer, or shelf at a time. You can't clean clutter. I will Give away what I don't need, Throw away what is beyond help, put away what is out of place, and store what I want or need in proper storage areas.

3. Food - I will fill out and stick to a monthly menu plan for dinners. another meal planner

4. Finances - I will not impulse spend in January. If I really want something, I will add it to my list and save for it.

5. Physical - I will return to my South Beach Diet for the whole month of January. I will also work out at least 5 days per week.

6. Spiritual - I will read 5 pages of the Book of Mormon every day.

7. Preparedness - I will purchase 800 pounds of wheat.

I am so excited to have someone to be accountable to for the goals I want to accomplish.
I have some goals I want to accomplish on my blog here as well but you will find out about them soon enough. hee hee ... It's gonna be great in 2008!

Sunday, December 16, 2007

Gingerbread Hot Cocoa

I thought I would share some of our family's Christmas Traditions. (I hope I get more than just this one posted.)
Every Christmas my children and I usually make hot cocoa mix of some sort to give to our friends and family for gifts. A couple of years ago we stumbled onto a recipe for a spiced hot cocoa. It has quickly become a family favorite. It tastes like gingerbread Cocoa.
Texas Cocoa
Here is the recipe:

Gingerbread Hot Cocoa Mix:
1/2 cup sugar (we use sucanant)
1 Tbsp flour
1/4 cup cocoa powder
1 tsp ground cinnamon
3/4 tsp ground cloves
1/8 tsp ground allspice
1/4 tsp salt

Directions:
Blend the mix ingredients together and store in an airtight container with a lid until ready to use. Makes 3/4 cup mix.

To make hot chocolate, add 3/4 cup mix to 2 cups water and simmer for about 4 minutes. Stir in 6 cups milk and reheat. Add 1 tsp vanilla and serve.

For single serving:
Add 1 1/2 Tbsp mix to 1/4 cup water. Boil until thickened. (I don't think it need the full 4 minutes here) add 3/4 to 1 cup milk and reheat. Add a bit of vanilla and enjoy.

We like to package this up and send it with Christmas goodies to those choice friends that love spicy things.
Check out this link for many more hot cocoa recipes.

Saturday, December 15, 2007

More Ornament Fun

I received three more ornaments this week from the ornament exchange.

First I got this stocking from Jennifer of Jennifer Yellow Hat from London.
Ornament 1

Next I received this Octopus Fun from Jennie in Brooklyn, NY.
Ornament 2

Finally I received this fun ornament from Camilla in London.
Ornament 3

This has been so much fun. I can't wait to see what else I get. I am expecting 5 more ornaments in the next week or so.

Wednesday, December 12, 2007

Monkey Love

Monkey 1
I do follow in the footsteps of my mother from time to time.
I too make Christmas ornaments for my children. I know that someday soon she will not be here to make ornaments for them. I wanted this tradition in place so that when that day does come it will already be in place and the transition will not be as hard.

This year I made Monkeys. I couldn't decide what to make and then saw Jeddie put my little
Ivan monkey on the tree and I decided to make a tiny Not So Sock Monkey.
Monkey 2
I did not make
99 like she did but I did make 30 of them.
I also happened to participate in a couple of swaps this Christmas that made in necessary to make a few extras.
Monkey 3
This is Hannah's White Monkey. I let each of the kids pick out which monkey they wanted. It was funny to see them pick the ones I had actually made with them in mind.

I have 4 extra monkeys over at my Etsy Shop. If you want one before they are gone, go snatch it up.

Tuesday, December 11, 2007

Laudry Soap

Soap 1

On occasion I make my own laundry soap. I started making it out of necessity. My daughter Sarah had the most sensitive skin when she was born and I wasn't able to use any commercial soaps, detergents or wipes on her or she would break out into a nasty rash.
I started making my own soap at that time and that translated over to making my own laundry soap.
Later, when Bryan lost both his jobs and we had to cut everything way back, I saved us a lot of money by making my own laundry soap, along with several other economical practices.

Here is the recipe I am currently using.

Ingredients:
Plain Lye Soap (I make my own)
Washing Soda
Borax
Essential oils
Soap 2
The directions are simple enough.
I take the bar of soap and grate it with a cheese grater.
Then I take equal parts soap, washing Soda, and Borax.
I place all these in my food processor and blend it until it is a fine powder. Then I add some essential oils that I like. A blend to mix them in well.
My current favorite scent is made from equal parts tea tree, lavender, and peppermint essential oils.
Soap 3
To use this I add about 1/4 cup per washer load.
If you have hard water, you may want to add about 1/2 cup of white vinegar to the rinse cycle. It will help prevent soap build up on the cloths. It also serves as natural fabric softener. I won't leave your cloths smelling like vinegar either.

The soap really gets the cloths clean. The essential oils make the cloths smell great too.

Here is a link to one of the first laundry soap sites I found several years ago. I have made the soap her way too. I like it that way but sometimes I don't have the luxury of time to make the liquid soap.
I have used this soap to clean my cloth diapers and am really happy with the results.

Friday, December 07, 2007

Pay It Forward

I love this concept. I won't tell you how long it took me to get it. I knew what to do but I didn't know why you called it that. Then when explaining Pay Backs to my little kids it all dawned on me and the wording quit messing with me. (no I'm not slow just preoccupied most of the time). I had been doing it all my life but had been calling it "being nice." It is what my mom told me to do so I did it.

I like Pay It Forward too as a mom because you are really Teaching others how to doing selfless things for still others. It is marvelous.

I read about doing it through blogs over at Starla's Blog. She is my Christmas Traditions Swap partner. I am so excited and nervous about what I am sending her. We are from very different places. Anyway, on to how the game is played .....

Here's how it goes:I will send a handmade gift to the first 3 people who leave a comment on my blog requesting to join this Pay It Forward exchange. I don’t know what that gift will be yet and you may not receive it tomorrow or next week, but you will receive it. The only thing you have to do in return is pay it forward by making the same promise on your blog. So, if you're one of the first 3 people to comment, copy and paste the above paragraph on your blog and share the crafty love!

I do need to be able to get a hold of you somehow. If I can't get you for some reason I will choose the next person. You need to post here and then Post this Exchange on your blog and I will contact you.

**** Edited to Add ********
If you missed out on this (because you are not one of the first three) you can still get in on the action at my sister Jeanne's Blog or my niece Angelic's Blog. They both have wicked mad crafting skillz.

Tuesday, December 04, 2007

New Sexy Aprons

I have been sewing my fingers off lately and finally got a chance (and some good weather) to take some pictures of the aprons I finished.
Berries and Boots Emma 1
My lovely friend, Miss Emma, agreed to let me use her hot little bod to take some pictures this morning. She is one of the legendary sisters of the Damsel in this Dress family.

You've gotta love Missouri winters. It as threatening snow on Sunday and today it was warm enough to be out in short sleeves.

Anyway, we had a lot of fun shooting the aprons with Jeddie's help of course.

Thank You Emma!
Boots n' petals 4 Retro Flowers and Stripes 2 Retro swirls 1
You can find all of these at Sexy Apron Day!

Monday, December 03, 2007

99 Octopi

3

I would like to share with you a little bit of our Family's Christmas Traditions.
Every year my mother makes a hand-made ornament for each of her grand children. This sort of started as a fun crafting activity and grew into necessity. You see, my mother has many grand children. She knew she could never afford to buy them each a gift for Christmas and so this became the family tradition. I so excited not that we have five children that our family tree is starting to fill out with family decorations.
This year my mom decided to make Octophrost, Santa of the Sea found at Futuregirl. He was just too much temptation. She knew it would take a while and started early this year (May or June I think). It took her about 8 hours to make each of the Octopi. She finally finished this week with number 99. That leaves her 5 for her own tree.
Here are the photos......
99 Octopi 1
There once was a woman who lived in Mizzou
She has so many grandkids--a hundred or two,
I would have spanked them all soundly and sent them to bed
but she loved them and sewwed them all octopi instead.
-Glynn
Blinking
I love how this guy just blinks at you, keeping his Christmas day secrets to himself.

1
These two are plotting some Christmas mischief. What out who's house they go to!

4

The Helpers
Hannah, Sarah, and Caroline
These are the helpers that helped Grandma stuff the tree with the 99 octopi.


"The Octopus' Garden"
I'd like to be, under the sea
In an octopus' garden in the shade
He'd let us in, knows where we've been
in his octupus' garden, in the shade.
I'd ask my friends to come and see
An octopus' garden with me
I'd like to be under the sea
In an octopus' garden in the shade.
We would be warm, below the storm
In our little hideaway beneath the waves
Resting our head, on the sea bed
In an octopus' garden near a cave
We would sing and dance around
because we know we can't be found
I'd like to be under the sea
In an octopus' garden in the shade
We would shout and swim about
The coral that lies beneath the waves
(Lies beneath the ocean waves)
Oh what joy for every girl and boy
Knowing they're happy and they're safe
(Happy and they're safe)
We would be so happy you and me
No one there to tell us what to do
I'd like to be under the sea
In an octopus' garden with you
In an octupus' garden with you
In an octupus' garden with you.
(thanks Kathie for reminding me!)

Sunday, December 02, 2007

Yipee - First Ornament

I got brave and joined an ornament swap this year over at Freshly Blended.
I am so excited. There are 10 of us in my group.
Yesterday I got my first ornament from Alison in New Zealand.
Alison
Isn't it just marvelous!?!
I love the package. I have something to store it in when Christmas is over and keep the info with it. Thank you Alison!
It is a Pukeko which is a Swamp Hen. I love it! The perfect gift for a Prairie Hen. Hee Hee.
I need to get on the stick and get mine shipped out this week. I will post them once I have them ready to go.

Saturday, December 01, 2007

Christmas Sales

I am putting a few sales up at my various web stores.

At Byrd Bath Soaps:
All the Soaps are $3.00 per bar till the end of the month.

At My Byrd Nest (etsy)
I have put several things at reduced prices.
I have also added some new items.
This year I am offering a small gift set which consists of:
a bar of soap
a handmade wash cloth
and a pine soap dish
V green 2
My friend Suzanne knit up all the wash cloths for me.
Orange 2
She did a fabulous job. I love the colors she picked. These are my favorite wash cloths for my face and for dishes. They never wear out and they always smell good. Cotton is marvelous that way.
Dish cloths

At Mama Byrd Creations (hyena cart)
I have just stocked a bunch of my friends woolly moccasins. They are made from real sheep skins and are very warm and toasty.
Dark 1
I just bought a whole set of them for my kids for Christmas this year. I think they suspect them and are pretty excited. I have several pair here around the house and they keep hinting at how marvelous they think they look and feel and "wouldn't they just keep our little feet so warm, mama?" hee hee I can't wait to see their faces on Christmas.

At Sexy Apron Day, I have a stack of new Aprons to go up as soon as I can get them photographed. My model has been super busy and the weather here is so cloudy and windy making photo shoots very difficult. They will be posted soon though even if it is with temp pictures.
Flower 1 Purple 1 Shoes 1 Pink Polka Dot 4

Thursday, November 22, 2007

Apronista Giveaway - Farm Chicks!

Apronista is hosting yet another fabulous Aproning giveaway. The wonderful prize or I should say prizes are from Farm Chicks.

They are giving away a gift bag with a couple of treasures in it.

This is the one I just love. That scrap of wallpaper makes my heart sing!

farm chicks


Their site is full of other aproning and farm girl goodness.

Monday, November 12, 2007

November Apron Tutorial - Kappogi - Traditional Japanese Apron

Kappogi 1
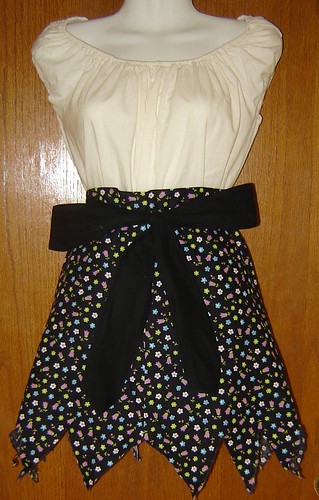
Miss Fanny and the Kappogi Aprons.

I have loved the Japanese apron for many years. My mom actually has had a pattern for it (and of course now we can’t find it.)
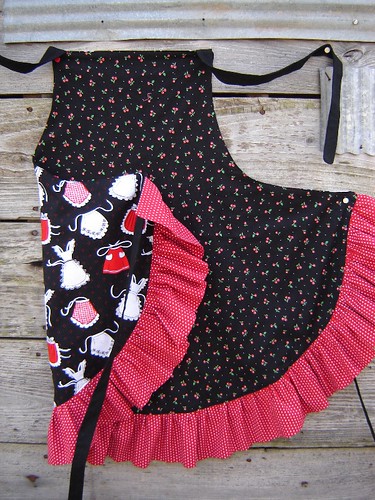
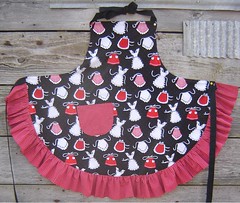
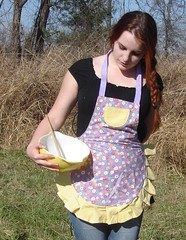
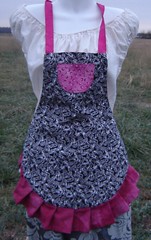
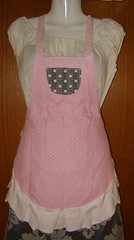
I love this apron because it covers everything. In honor of Thanksgiving and all the cooking we will be doing here next week (recipes to come of course), I thought I needed an apron that covered most of me so I can cook like a maniac, peel my apron off, and greet my guests in perfect cleanness.
A Sexy little apron is great when you are just heating things up for dinner or for doing the wash but when you are doing the "From Scratch Holiday Baking" that happens at Byrd house, you need a tent. Hee Hee

This apron was so easy to make. I had a ball. I hope the tutorial doesn't just mess everyone up.

The Kappogi is the tradidional Japanese "Country Style" apron. It was designed to keep your Kimono Clean. I was told that the word mean Kitchen and to wear so it is basically Kitchen ware. Funny.
My sister in law, Miyuki, let me borrow her apron to look at. I love hers but it was made for a small Japanese woman. I am not small or Japanese. My arms are just too long for it and I need it to go further around. Hee Hee. Sooooo….. I looked at hers and took many measurements and came up with something that will fit a taller, rounder, long armed Western Woman.
Here is the fairly simple tutorial (you’ve got to love Japanese simplicity.)
I started by taking my measurements and decided that the thing had to go around my widest part with some room to spare. I don’t think you need to know my numbers, (I don’t even want to know them.) I will give you my cutting measurements though.

Supplies:
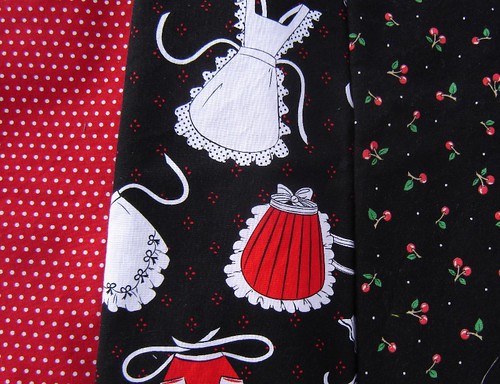
2 yards fabric for the apron
1 fat quarter in a coordinating color for collar and pocket.
Some elastic for the sleeve.

Measurements:
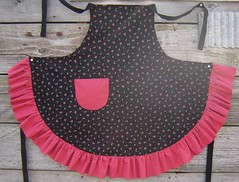
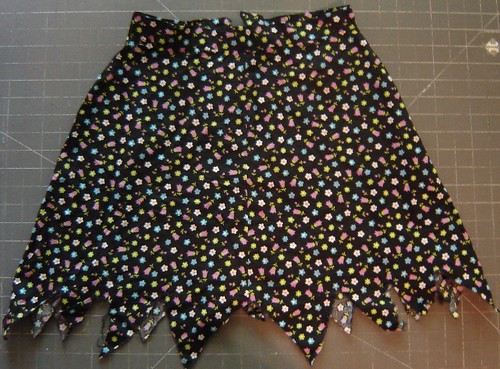
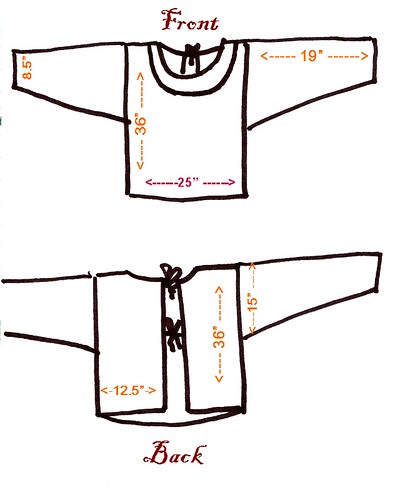
I decided to make the apron 36” long. That puts it a mid thigh on me and I like that. You want it to be just longer than your finger tips so when you wipe your hands it goes on the apron and not your pants or dress. I decided to make the apron should be 50” round. That gives PLENTY of room. Hee Hee. If you need it narrower or wider you can adjust my measurements later. I also made the sleeves about 19” long.
Kappogi 2

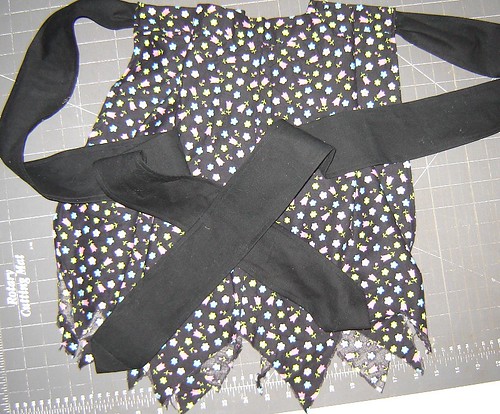
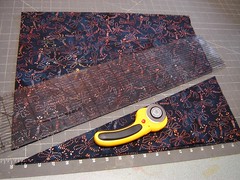
Cutting instructions: (SAVE ALL YOUR SCRAPS - YOU WILL NEED THEM)
Kappogi 3
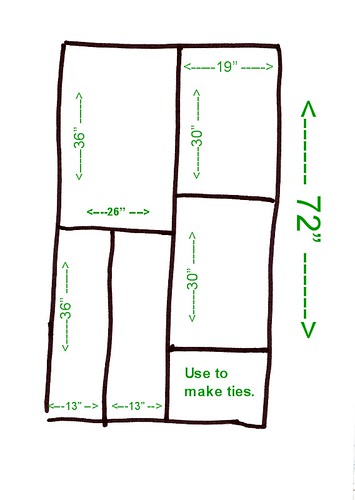
This was so simple. Here is what I did. I took the fabric and made sure it was exactly 72” long (36”x2). From that I cut 1 piece of fabric 72” x 26”. This is for the front and back. I then cut that piece in half 2(36” x 26”). One of these is the front. I took the other and cut it in half 2(13”x36”) These make the back. You need to taper the shoulders. I did this by putting my ruler along the top edge of all the shoulders together and coming down 1” from the outer shoulder edge. I cut that off.
kappogi 5

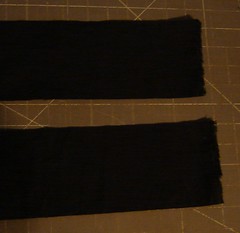
From the remaining fabric I cut the sleeves. My fabric was 46” wide so after the front and back were cut, that left me with a piece about 20” x 72” I evened things up and ended up with a piece that was 19 ½ inches wide. Each sleeve needs to be 19” x 30” . Take the sleeve pieces and fold them in half so they measure 15” x 19”.
Now take your ruler and measure up from the bottom edge to 8.5” down from the other edge. Cut along there. This will make the sleeve taper at the cuff.
Kappogi 4

Now the detail cuts for the neck hole.
The traditional neck hole on the Kappogi is square. That was a little complicated (for a tutorial) so I went for a rounded neck. It is easy to make, tute, and then I wasn’t copying the apron exactly. You can do what ever you like.
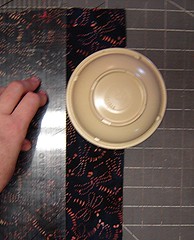
Take your apron front and fold it in half lengthwise. From the folded edge, come in 3”, from the top edge, come down 7 inches.
Kappogi 6
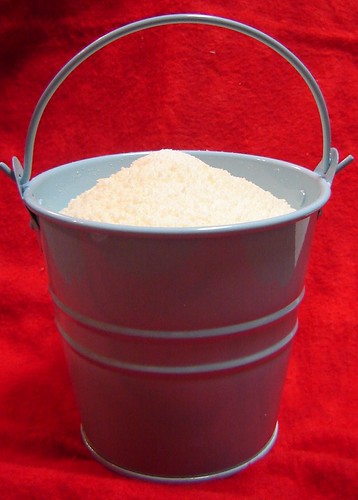
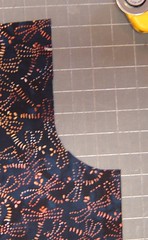
I used a pen and marked a curve that fit in those dimentions (the bowl helped with the curve.) Now cut out that piece and SAVE it.
Kappogi 7

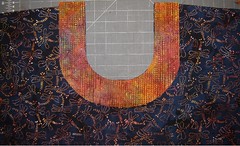
Now to make the collar, I took the coordinating scrap I had and place the folded neck cut-out on top of it for a guild.
Kappogi 9
I cut that out and then added 2 ½” all the way around. I did this by laying the ruler next to the edge and making little marks and then connecting the dots and cut it out. Now you have a big U shaped piece.
Kappogi 10

To do the back neck, I took the left over piece from the sleve and cut it so I had a short piece to go at the top for facing. I placed all these pieces together and cut them all at once. I came in 3” from the center. Then I came down 2” from the top and made a curved line. I placed the front on top of the back and made sure that the were even.
Kappogi 12

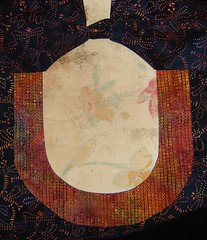
Now you need to make the pocket. For this I took the left over neck piece U from the apron and from the collar and placed them together. This will be my lined pocket.

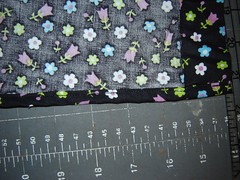
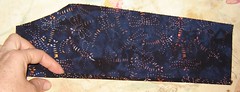
Last of all you need to cut out the ties. They need to be 2” wide and as long as you want them about 10“-12” will do. Cut them from your scraps. You need 4 of them.

Now to SEW: Use ¼ inch seams everywhere
First sew the ties.
Fold them in half lengthwise and sew them along the side and one end. Turn and press them.
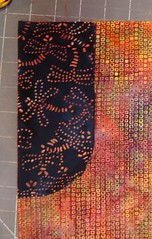
Now do the collars.
Place the contrasting U on the Front piece WRONG sides together. (yes this is backwards) Sew them together. Clip the curve and flip the collar to the outside. Press in place. Now take the outside edge of the collar and fold it under about ¼” and top stitch it down. This is actually like facing done inside out.
Kappogi 11

For the back, take the lining pieces and fold the bottom edge under ¼”. Now place the lining and the back pieces together, right sides together. Pin them in place. Be sure to add the top ties between the layers. Sew them together along the curve and side, leaving the top open.
Now to sew the front and back together.
Kappogi 13
It is a little tricky but not hard at all.
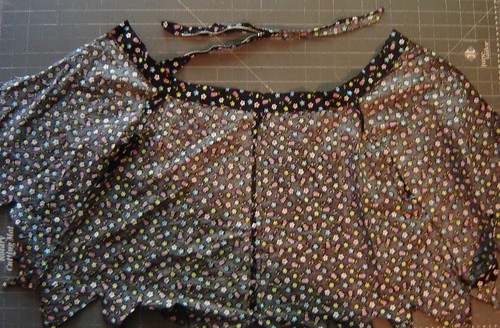
You are going to sandwich the front top between the back and the back lining. Make sure you get the neck pieces together smoothly . How I did this sandwiching was to pin the front and back pieces together (right sides together), then I folded the lining over the top of that and pinned it in place. I then sewed that top seam together. I turned and pressed the whole thing. Then I stitched the lining to the back along the folded edge. (I know my words are getting in the way here. I hope this all makes sense.)
Kappogi 14
Now sew the sleeve. Sew the sleeve seam. Fold under the edge of the sleeve and make a casing for the elastic. I cut a piece of elastic long enough to go around my wrist and then some extra. I put that inside and sewed it shut.

Now sew the side seams together. I placed the sleeve along the side of it to know where to stop sewing. When the seams are sewn together, place the sleeve inside and stitch it in place.
Now finish the apron up by hemming the edges of the back pieces. Then fold up the bottom edge and hem it. You also need to add the second ties on back about 10-12 inches from the top.
You also need to add the pocket to the front. I just put the apron on and pinned the pocket where I thought it should go.

To sew the pocket, place the two neck pieces together and stitch all the way around, leaving a hole along the top of the pocket for turning. Clip the curve, turn and press the pocket. Then fold down the top edge of the fabric showing the contrasting fabric at the top. Stitch in place on the pocket and you are DONE!
Kappogi 16
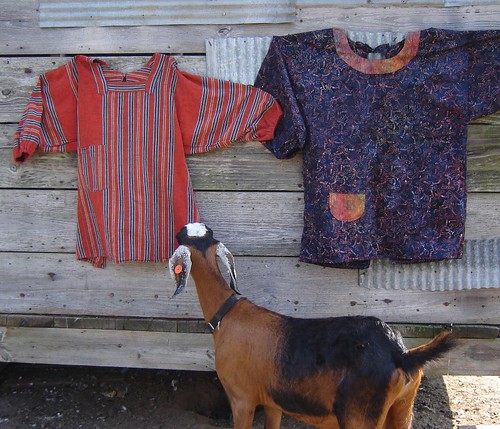
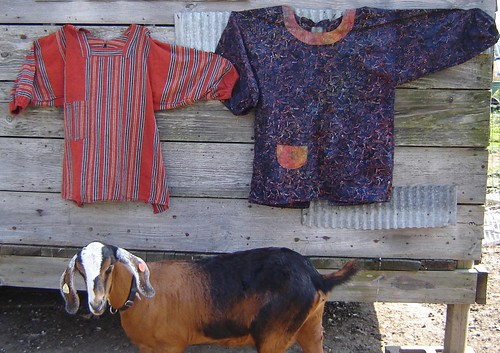
Miss Fanny is the only goat we have left right now. She is very clever and knows how to jump flat footed over her fencing. (a new place everyday too.)
She heard me in the chicken pen taking photos today and had to come and check the whole thing out. She was most interested in both the aprons. (No she didn't bite them, she was looking closely at the fabric. HONEST!)
She is a very sweet and friendly goat. Just too nimble.
Kappogi 15
Related Posts Plugin for WordPress, Blogger...